Monday, February 10, 2020

IoT Development Boards For DIYers And Electronics Enthusiasts

Equipped with features such as inbuilt Wi-Fi, Bluetooth along with impressive memory and processing speeds
Image credit: www.pixabay.com
When it comes to selecting a suitable development board for your IoT project, DIYers and electronic hobbyists (especially beginners) often have to go through a long list of hardware components out there. The end result is a big confusion. To ease that, below is a list of tried and tested development boards that will help you achieve your target.

Arduino Uno

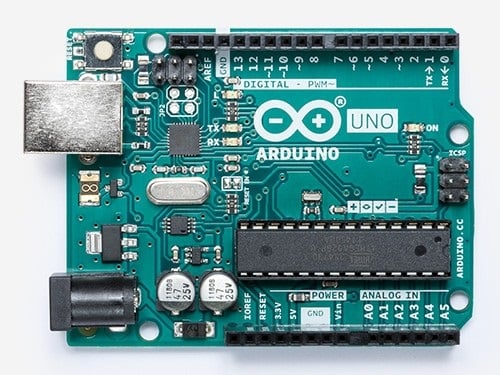
Popular and widely used, the Arduino Uno is based on ATmega328P and is equipped with 2KB SRAM, 1KB EEPROM and a clock speed of 16MHz.
Image credit: www.arduino.cc

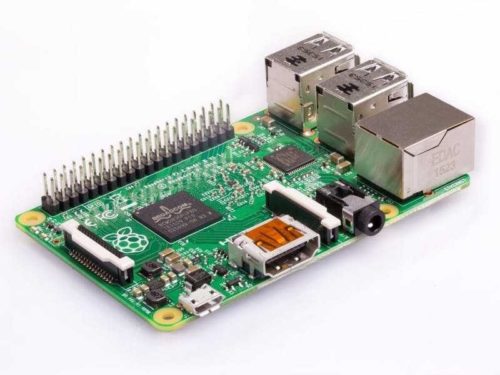
Raspberry Pi 2

Another widely used board, the Raspberry Pi 2 is the second gen model of Raspberry Pi. It has a 900MHz quad-core ARM Cortex-A7 CPU and 1GB RAM.
Image credit: www. raspberrypi.org

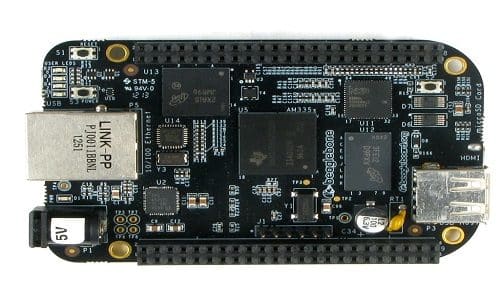
BeagleBone Black

The BeagleBone Black is a low-cost, open source development board that is equipped with 1 GHz AM3359 Arm Cortex-A8 and 512MB RAM. It runs on Linux.
Image credit: www.beagleboard.org

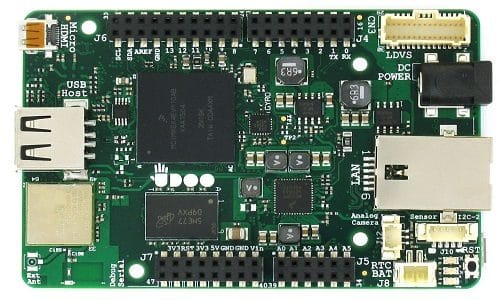
Udoo Neo

The Udoo Neo is an open hardware low-cost development board for Android and Linux. It has Bluetooth 4.0 and a Wi-Fi Module. The board is equipped with two processor cores: a 1GHz ARM Cortex-A9 and a 200MHz Cortex-M4.
Image credit: www. udoo.org

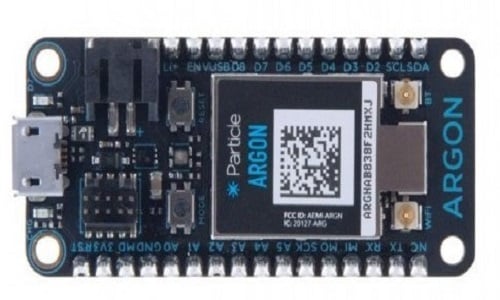
Particle Argon

Based on Nordic’s nRF52840, the Particle Argon is a powerful Wi-Fi enabled development board that can be used either as a standalone Wi-Fi device or a Wi-Fi enabled gateway. It has an on-board Li-Po charging and battery connector.
Image credit: www.particle.io

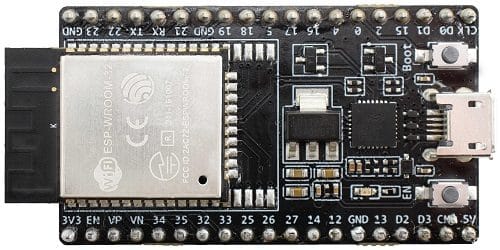
ESP32-DevKitC

The ESP32-DevKitC board has a 4MB Flash with integrated Wi-Fi and Bluetooth connectivity and PCB/IPX antenna for outstanding RF performance. It has a wide operating temperature range of -40 degree Celsius to 85 degree Celsius.
Image credit: www.espressif.com

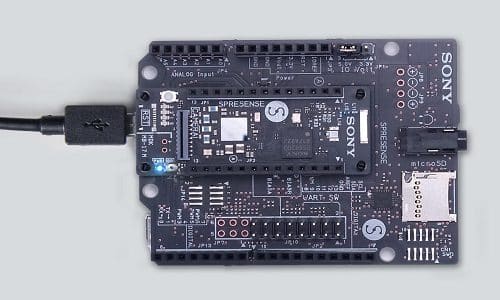
Sony Spresense

Sony Spresense is powered by Sony’s CXD5602 microcontroller, that has 6 ARM Cortex-M4F cores with a clock speed of 156 MHz. Along with a powerful microcontroller, the features integrated GPS, hi-resolution audio output and multi mic inputs. The board is supported by Arduino IDE.
Image credit: www.developer.sony.com
Note: Intel Galileo is also suited for IoT projects, but has not been included here as the company has ended support for its development board.

What’s Next For Arduino?

Arduino, an open-source electronic platform for fast prototyping, helps electrical engineers prototype/design their projects, with the intention that they will turn into commercial products down the road. It’s also a great tool for students or individuals who don’t have an electrical engineering background—they can learn about microcontrollers and programming when using Arduino’s kits and the Arduino library.
Currently, Arduino’s focus is directed more toward Internet of Things (IoT) communications. The MKR series of boards provides different options for connectivity and power management, encouraging people to use them as one standard format for IoT projects. MKR boards can bring more standardization to the design process, making the designer’s life easier when trying to sell a final product in the market—that’s because many designers/makers will likely use this same format for their IoT projects.
Www Electronicdesign Com Sites Electronicdesign com Files Arduino Banzi Fig1
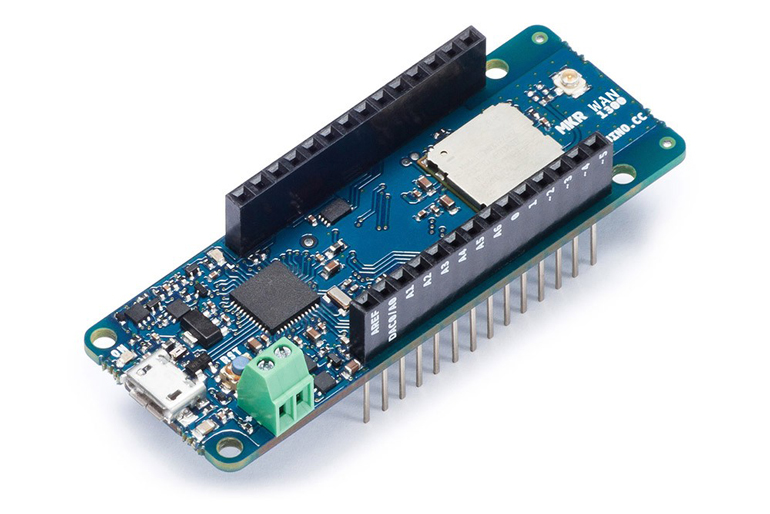
1. The new Arduino MKR WAN 1300 is based on the Atmel SAM D21 microcontroller, which integrates the 32-bit low-power ARM Cortex-M0+ processor. (Courtesy of Arduino)
Arduino already has a Wi-Fi board, a board without connectivity, and a Sigfox board (all are open source). Massimo Banzi told us that at Maker Faire, Arduino launched two new boards: the MKR WAN 1300 and the MKR GSM 1400. Both of these highly compact boards measure just 67.64 × 25 mm.
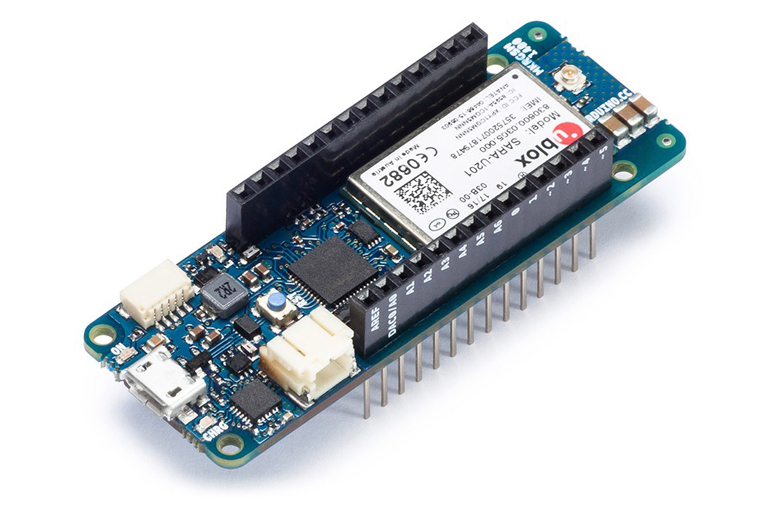
The MKR WAN 1300, supported by LoRa (the low-power wireless protocol for IoT projects), has the ability to power the board using two 1.5-V AA or AAA batteries or an external 5-V input via the USB interface (Fig. 1). The MKR GSM 1400 is powered by 3G GSM for projects demanding that designers have connectivity anywhere in the world (Fig. 2). It was built in partnership with u-blox for global 3G communications, and is based on the Atmel SAMD21 and a SARAU201 GSM module.
Www Electronicdesign Com Sites Electronicdesign com Files Arduino Banzi Fig2
2. Arduino’s MKR GSM 1400 is based on the Atmel SAMD21 and a SARAU201 GSM module. (Courtesy of Arduino)
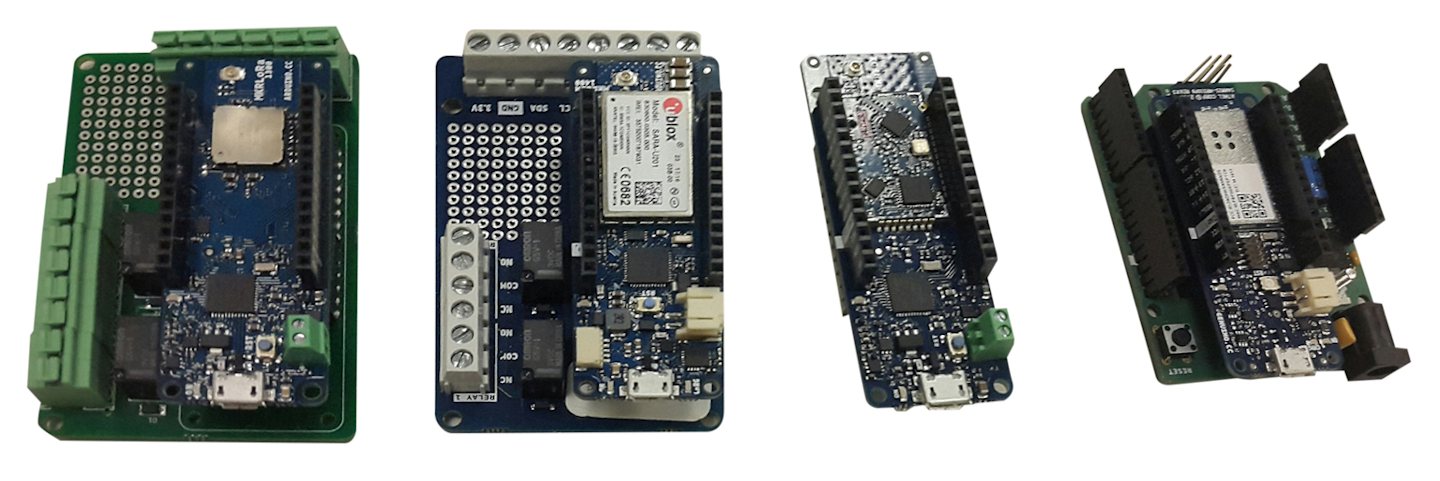
Banzi said, “The idea is to reuse the same format to produce a wide range of different modules, shields, adapters, carrier boards, etc.” Arduino has a couple more in the making, and they will come out soon.  “With these four boards,” Banzi noted, “we are covering most of the use cases” (Fig. 3).
When asked about the risk of hacking for IoT devices, he emphasized, “Security is an investment. You will invest money depending on how valuable what you are trying to protect is.” He explained how secure the new IoT devices are: “Every chip has an encryption and authentication process, so basically all the passwords that you would use to access a cloud service are not stored in the code; they are actually stored in the chip.”
Www Electronicdesign Com Sites Electronicdesign com Files Arduino Banzi Fig3
3. Pictured from left to right are the LoRa board, GSM board, Sigfox board, and Wi-Fi board.
For part of the cloud, Arduino uses Amazon Web Services, which is properly secured on its site. When a board wants to connect to the network, they basically create the connection without any visible password in the code.
Banzi also said that Arduino is now developing a cloud platform. Some of the parts of the cloud platform are public via an Arduino development environment in the browser called Arduino Create, which enables makers to write code, access content, configure boards, and share projects.  With Arduino Create, it’s possible to program all cloud-based modules just with the browser, enabling the devices to be programmed remotely. Arduino is going to work with the community to make the software available to all different platforms. If people don’t want to use Arduino’s development environment, they can use whatever editor/cloud they want.
Arduino is also committed to empowering educators with the necessary hardware and software tools to create a more hands-on learning experience. However, according to Banzi, one of the biggest issues Arduino finds when trying to use Arduino in schools is that it’s difficult to find teachers willing to create an Arduino class.
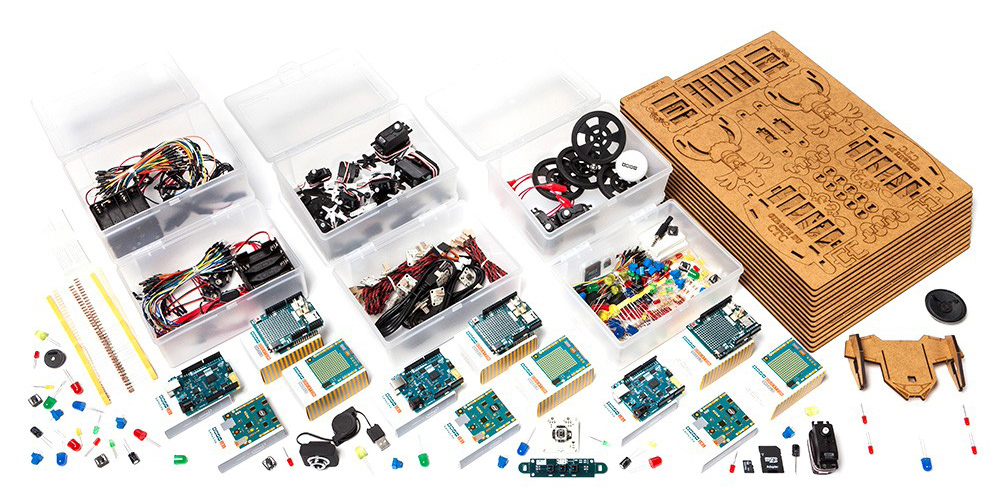
To help already busy teachers, Arduino created a program called Creative Technology for the Classrooms (CTC). The CTC program is designed to run from 12 to 19 weeks. It includes a part that concentrates on teaching educators how to teach the material. The program is oriented for students between the ages of 13 to 17, and the content includes programming Arduino, robotics, and more. Once students build their own project, the schools are encouraged to organize mini events to display the projects.
Www Electronicdesign Com Sites Electronicdesign com Files Arduino Banzi Fig4
4. The CTC KIT 101 has more than 25 hands-on experiments with different degrees of complexity to accommodate various skill levels. (Courtesy of Arduino)
At the moment, the program is available in English, Spanish, Italian, and Swedish. Depending on the country, there might be a local company that buys the classroom kit from Arduino and delivers it to the schools, or sometimes the school does it itself. The kit contains enough components for 20 students; students can go online and register with a code. The teacher also has an online platform for training support. During the weeks of the program, teachers can attend webinars to clarify any questions or issues. Arduino is trying to make the content gender-neutral to try to catch the attention of boys and girls. The kit available in the U.S. is called the CTC KIT 101 (Fig. 4).

Wednesday, November 20, 2019

Decisions, decisions: Hardware accelerator or DSP?

In this blog I want to talk about a more detailed analysis you can follow to decide if you should be thinking about a DSP rather than an HWA implementation.

(Source: CEVA)
I mentioned in the last blog some of the ideal applications for DSPs. Signal processing for modem or audio signals are obvious examples. Another very common example is the signal processing in radars for autonomous cars, which is quite similar to the signal processing in a modem. Many of these have been built around a hardware accelerator combined with a small controller. We’re now seeing a significant trend among those solution-providers to switch to architectures in which more of the functionality is based on software running on a DSP, combining the signal processing currently handled by the HWA and even some control. The reasoning is simple: Software provides more flexibility in functionality and much lower-cost and more timely ability to adapt to evolving communication standards.
Global positioning is another application, in this case heavily leveraging the math capabilities inherent to DSPs for the triangulation calculations. You might initially think that GPS support is all you need and perhaps you can build a really fast implementation in a hardware accelerator. However in the global GNSS standard you also need to consider support for GLONASS (Russia), Galileo (Europe) and BeiDou (China). A hardwired implementation for GPS may limit your markets unnecessarily since supporting all variants can be accomplished in software if you’re running on a DSP.
So far, so good in principle, but how will a DSP implementation perform versus a custom hardware implementation? I’ll illustrate with one popular example today: Say you’re building an IoT application and you plan to use NB-IoT for communication. The sub frame length is 1ms which defines a bounding limit for certain processing that must be completed within that time. In this example, that would include the physical layer algorithms, the L1 control code and the protocol stack. For a typical low-power DSP/NB-IoT platform running at 100MHz, 1ms gives you 100k cycles in which to complete those calculations.
To estimate what kind of performance you can expect in an equivalent DSP implementation, you’ll need to work with an embedded DSP vendor. Such a company should already offer software solutions on their platforms for multiple applications, which they will have characterized for performance and power. For performance they should be able to give you a cycle-count estimate for your function, in this case an NB-IoT modem, and provide you with a graph, similar to the one below. Each point in the graph represents the number of cycles required to execute and the graph is charted across a time-varying range of loads. The graph should also show peak-allowable cycles given a selected operating frequency.

(Source: CEVA)
Now you have a method to estimate whether your application load will work at that frequency, or whether you might need to increase the frequency to give you more headroom. Of course this estimate is based on the vendor’s software implementation, though it’s reasonable to expect it will be pretty well tuned. You don’t have to commit to using their software, but the estimate should be good enough to guide your decision-making.
If you have plenty of headroom at your preferred operating frequency, perhaps you can move more HWA functions onto the DSP, or maybe add more differentiating features such as GNSS location support. If on the other hand you need to increase the frequency to meet latency requirements, that is also possible though you should factor in that bumping up the frequency will increase area and power consumption.
A quick way to get an estimate of power is to look at how much of the software is going to go into true DSP code, using parallelism, MAC units etc., and how much is going to go into control code – the usual general-purpose code calling functions, making decisions and other standard operations. You can usually eyeball this split, say 40% control code and 60% DSP code. A DSP vendor will often provide typical power numbers for these two cases, for example 2mW for control code and 4mW for DSP code (in each case at 100MHz). In your calculation you should factor in the average activity of the DSP, for example 50% of the frequency. So in this example you would estimate (0.42 + 0.64) * 0.5 = 2.24mW average power (assuming 50% average activity).
In summary, you should be able to develop a pretty reasonable estimate of what performance and power you can expect for a DSP implementation of your accelerator function (unless you’re developing something really unusual – in this case you should model your application in the DSP’s SW tools to get a pretty accurate estimation for the cycle count). When you consider the added flexibility you get from a software implementation and the ability to save cost by combining multiple accelerators onto one processor, a DSP solution looks pretty attractive.

Saturday, September 10, 2016

Cutting Through the Confusion with ARM Cortex-M Interrupt Priorities

The insanely popular ARM Cortex-M processor offers very versatile interrupt priority management, but unfortunately, the multiple priority numbering conventions used in managing the interrupt priorities are often counter-intuitive, inconsistent, and confusing, which can lead to bugs. In this post I attempt to explain the subject and cut through the confusion.
The Inverse Relationship Between Priority Numbers and Urgency of the Interrupts
The most important fact to know is that ARM Cortex-M uses the “reversed” priority numbering scheme for interrupts, where priority zero corresponds to the highest urgency interrupt and higher numerical values of priority correspond to lower urgency. This numbering scheme poses a constant threat of confusion, because any use of the terms “higher priority” or “lower priority” immediately requires clarification, whether they represent the numerical value of priority, or perhaps, the urgency of an interrupt.
NOTE: To avoid this confusion, in the rest of this post, the term “priority” means the numerical value of interrupt priority in the ARM Cortex-M convention. The term “urgency” means the capability of an interrupt to preempt other interrupts. A higher-urgency interrupt (lower priority number) can preempt a lower-urgency interrupt (higher priority number).
 Interrupt Priority Configuration Registers in the NVIC
The number of priority levels in the ARM Cortex-M core is configurable, meaning that various silicon vendors can implement different number of priority bits in their chips. However, there is a minimum number of interrupt priority bits that need to be implemented, which is 2 bits in ARM Cortex-M0/M0+ and 3 bits in ARM Cortex-M3/M4.
But here again, the most confusing fact is that the priority bits are implemented in the most-significant bits of the priority configuration registers in the NVIC (Nested Vectored Interrupt Controller). The following figure illustrates the bit assignment in a priority configuration register for 3-bit implementation (part A), such as TI Tiva MCUs, and 4-bit implementation (part B), such as the NXP LPC17xx ARM Cortex-M3 MCUs.
 Interrupt priory registers with 3 bits of priority (A), and 4 bits of priority (B)
Interrupt priory registers with 3 bits of priority (A), and 4 bits of priority (B)
 
The relevance of the bit representation in the NVIC priority register is that this creates another priority numbering scheme, in which the numerical value of the priority is shifted to the left by the number of unimplemented priority bits. If you ever write directly to the priority registers in the NVIC, you must remember to use this convention.
NOTE: The interrupt priorities don't need to be uniquely assigned, so it is perfectly legal to assign the same interrupt priority to many interrupts in the system. That means that your application can service many more interrupts than the number of interrupt priority levels.
NOTE: Out of reset, all interrupts and exceptions with configurable priority have the same default priority of zero. This priority number represents the highest-possible interrupt urgency.

INTERRUPT PRIORITY NUMBERING IN THE CMSIS

The Cortex Microcontroller Software Interface Standard (CMSIS) provided by ARM Ltd. is the recommended way of programming Cortex-M microcontrollers in a portable way. The CMSIS standard provides the function NVIC_SetPriority(IRQn, priority) for setting the interrupts priorities.
However, it is very important to note that the 'priority' argument of this function must not be shifted by the number of unimplemented bits, because the function performs the shifting by (8 - __NVIC_PRIO_BITS) internally, before writing the value to the appropriate priority configuration register in the NVIC. The number of implemented priority bits __NVIC_PRIO_BITS is defined in CMSIS for each ARM Cortex-M device.
For example, calling NVIC_SetPriority(7, 6) will set the priority configuration register corresponding to IRQ#7 to 1100,0000 binary on ARM Cortex-M with 3-bits of interrupt priority and it will set the same register to 0110,0000 binary on ARM Cortex-M with 4-bits of priority.
NOTE: The confusion about the priority numbering scheme used in the NVIC_SetPriority() is further promulgated by various code examples on the Internet and even in reputable books. For example the book “The Definitive Guide to ARM Cortex-M3, Second Edition”, ISBN 979-0-12-382091-4, Section 8.3 on page 138 includes a call NVIC_SetPriority(7, 0xC0) with the intent to set priority of IR#7 to 6. This call is incorrect and at least in CMSIS version 3.x will set the priority of IR#7 to zero.

PREEMPT PRIORITY AND SUBPRIORITY

The interrupt priority registers for each interrupt is further divided into two parts. The upper part (most-significant bits) is the preempt priority, and the lower part (least-significant bits) is the subpriority. The number of bits in each part of the priority registers is configurable via the Application Interrupt and Reset Control Register (AIRC, at address 0xE000ED0C).
The preempt priority level defines whether an interrupt can be serviced when the processor is already running another interrupt handler. In other words, preempt priority determines if one interrupt can preempt another.
The subpriority level value is used only when two exceptions with the same preempt priority level are pending (because interrupts are disabled, for example). When the interrupts are re-enabled, the exception with the lower subpriority (higher urgency) will be handled first.
In most applications, I would highly recommended to assign all the interrupt priority bits to the preempt priority group, leaving no priority bits as subpriority bits, which is the default setting out of reset. Any other configuration complicates the otherwise direct relationship between the interrupt priority number and interrupt urgency.
NOTE: Some third-party code libraries (e.g., the STM32 driver library) change the priority grouping configuration to non-standard. Therefore, it is highly recommended to explicitly re-set the priority grouping to the default by calling the CMSIS function NVIC_SetPriorityGrouping(0U) after initializing such external libraries.

DISABLING INTERRUPTS WITH PRIMASK AND BASEPRI REGISTERS

Often in real-time embedded programming it is necessary to perform certain operations atomically to prevent data corruption.  The simplest way to achieve the atomicity is to briefly disable and re-enabe interrupts.
The ARM Cortex-M offers two methods of disabling and re-enabling interrupts. The simplest method is to set and clear the interrupt bit in the PRIMASK register. Specifically, disabling interrupts can be achieved with the “CPSID i” instruction and enabling interrupts with the “CPSIE i” instruction. This method is simple and fast, but it disables all interrupt levels indiscriminately. This is the only method available in the ARMv6-M architecture (Cortex-M0/M0+).
However, the more advanced ARMv7-M (Cortex-M3/M4/M4F) provides additionally the BASEPRI special register, which allows you to disable interrupts more selectively. Specifically, you can disable interrupts only with urgency lower than a certain level and leave the higher-urgency interrupts not disabled at all. (This feature is sometimes called "zero interrupt latency".)
NOTE: The BASEPRI register cannot disable interrupt priority 0 (highest urgency). In fact, writing 0 into BASEPRI re-enables all interrupt priority levels.
The CMSIS provides the function __set_BASEPRI(priority) for changing the value of the BASEPRI register. The function uses the hardware convention for the 'priority' argument, which means that the priority must be shifted left by the number of unimplemented bits (8 - __NVIC_PRIO_BITS).
NOTE: The priority numbering convention used in __set_BASEPRI(priority) is thus different than in the NVIC_SetPriority(priority) function, which expects the “priority” argument not shifted.
A few uses for an autonomous vehicle

From the time technology that we have come to know was invented, it has been used to gain an advantage militarily or to make life easier. Military usage seems to be a driving factor, but it is not the only factor.
Guerilla tactics played an even greater part in the US conflict in Iraq and Afghanistan. Using lessons learned fighting the Soviets in the 1980s and training from US backed anti-Soviet forces, the guerilla tactics did increasing damage to US military forces. Insurgents could build an IED from unexploded ordnance they recovered and use a cell phone to remotely detonate the device. These were particularly effective against the flat-bottom of the High Mobility Multipurpose Wheeled Vehicle (HMMWV or Humvee) in use at the time. New vehicle were developed, like the Mine-Resistant Ambush Protected (MRAP) vehicle. It has an angled bottom to help deflect the blast force away from the passengers. (Cougar, n.d.)
The most limiting factor for an airplane is the human pilot. The human body can only withstand so many G-forces before the pilot loses consciousness. A computer is not limited by those same forces.

Currently, research and field trials are being conducted on unmanned and autonomous vehicles. Autonomous vehicles can be programmed to follow a route or make decisions based on data from sensors. There are many reasons to use these vehicles on the battlefield. Unmanned aerial vehicles (UAV) can circle far above an area, unobserved, for as long as their fuel lasts, while sending live video feed back to the command center. Unlike manned aircraft, a UAV doesn’t place a human life at risk in the event of detection and counterattack. A small UAV could be carried on a backpack and used with an infrared camera or video camera to gain intelligence in a similar manner to the Civil War balloons. Pilots for larger drones, like the Predator, can fly from the other side of the world using satellites to carry the signal. (How, n.d.)
An unmanned ground vehicle (UGV), like the Recon Robotics ThrowBot could be quietly driven to a spot or even thrown through a window and provide a live feed so a plan could be developed to reduce human casualties. Some Police and Special Weapons and Tactics units are also making use of the Throwbot. Small vehicles like the iRobot PackBot can be carried and deployed to gain intelligence or deactivate Improvised Explosive Devices (IED). Some soldiers have been using radio controlled hobby vehicles to scout for IEDs ahead of their vehicle patrols. One vehicle found its fifth and final IED when “…the little truck was vaporized when it managed to set off a 500 pound IED that might have otherwise been triggered by the Humvee itself…” (Ackerman, 2011, para. 2)
In an effort to remove humans completely from danger, the Defense Advanced Research Projects Agency (DARPA) has sponsored competitions to develop autonomous, self-driving vehicles. The first competition placed vehicles in a desert environment. Another competition place the vehicles in an urban environment with other autonomous vehicles and human traffic. Autonomous convoys could deliver supplies through dangerous areas eliminating that risk to humans and freeing them for other uses.
The field of Search and Rescue (SAR) is a field ready for autonomous vehicles. When a building collapses, there is no room for humans to fit through the wreckage, or it could be too unstable. A small autonomous vehicle could fit through small openings to search for survivors and is expendable if it is lost. Unlike humans, autonomous vehicles don't suffer from long-term health conditions from exposure to asbestos dust or other dust from a collapsed building. Vehicles equipped with sensors could relay information about temperature and possible chemical leaks.
An aerial vehicle could be equipped with a Forward Looking Infrared Camera (FLIR) to help locate a lost person outside, but would be limited by overhead trees. An underwater vehicle could search rivers and lakes at deeper depths and for longer periods of time than a diver could.
An aerial vehicle could fly over flood waters and drop needed supplies to stranded people. They could be used in Third World countries to air-drop medical supplies to remote villages.
At the home, robotic vacuum cleaners could keep the floor clean. Robotic lawn mowers can keep the grass cut and snow plowing vehicles could keep the sidewalk clear.
For all the advantages of unmanned vehicles, there are many disadvantages. Humans still retain the final decision to fire weapons, so how many levels that decision has to travel, could make it a disadvantage. To avoid confusion, a clear chain of command must be established and maintained. 
Man-portable devices are limited in size and dependent on how many replacement batteries are carried. Larger systems require more logistical support. UAVs are dependent on fuel to stay in the air.
In Vietnam and other areas of the world, even parts of the US, the jungle canopy provides a barrier that helps to conceal movement from aerial vehicles. This can be mitigated to some extent by infrared cameras that detect differences in heat between an object and the surrounding environment.
Live-feed video is a remarkable surveillance tool when used properly. Improper use can lead to “battlefield micromanagement”. “More and more frequently, generals insert themselves into situations inappropriately, and their command leadership role becomes command interference.” (Singer, n.d., pg. 80)
“While this general was doing a job normally entrusted to junior officers, who was doing his job? New technologies allow him and other senior flags to make tactical decisions as never before. But the captains, majors, colonels, and so forth, whom they cut out of the chain, cannot, in turn, assume responsibility for the strategic and policy questions that the generals would have wrestled with instead.” (Singer, n.d., pg. 81)
Those officers in the field may not gain the decision making experience they will need when they are promoted to higher ranks. This lack of experience could cause a significant problem as senior leadership retires.
One concern with the use of unmanned vehicles is that, without human lives being at stake, more wars will be fought because the machines can be more easily replaced. The only way to prevent this would be adherence to strict international policy.
Another advantage and disadvantage is that the opposing force will not be able to directly attack the stronger force, leading to a rise in asymmetric warfare. Guerilla tactics, like ambushes and IEDs, could become more prevalent. New technologies, like autonomous vehicles, will be developed to counteract this. This could result in an arms and tactics race between the two forces.
With the rise in guerilla warfare and unknown terrorist cells, DARPA’s Improv Program has asked industry and skilled hobbyists for submissions for new ways technology could place assets at risk. 

Choosing a Microcontroller for Your Vehicle

There are many things to take into consideration when choosing a microcontroller or microprocessor for your autonomous vehicle.

Voltage
Some processors run on 5V and others use 3.3V.  Be sure to check the documentation before you buy.  Make sure your supply has a high enough amp rating that your microcontroller doesn't lose pwer.

Power
Can the system run using batteries?  Large, automotive sized vehicles can be run from large batteries or inverters in the vehicle.  Smaller vehicle power supplies must be scaled down in order for the vehicle to be able to move.  Regular AC power must be plugged into a wall and would be limited by the length of the wire.
Price
If you are building one item, price may not be a big concern.  If you are designing for production, every penny counts.  
Storage / Memory
Larger programs take more space to store and to run.  Microcontrollers typically do not have the storage space and vast amounts of memory that a microprocessor would normally have.  Programs must be smaller and should be more efficient.
Availability
Some older chips are no longer widely available, and can be expensive when they are found.  This can be a major consideration if you are designing something for production.
Capability
Many inexpensive microcontrollers are 8 bit, but prices for 32-bit controllers are getting lower.  For a basic vehicle, like a line-follower or simple obstacle avoider, an 8-bit microcontroller like the Arduino Uno is sufficient.  If you are going to have many sensors and motors or servos or vision processing, a 32-bit microcontroller with a Real Time Operating System (RTOS) would be a better choice.
Input and Output
When you choose a microcontroller, you must count the number of inputs and outputs that are required for the project and choose the microcontroller accordingly.  Something to keep in mind while doing that is the possibility of future expansion.
You must also count types of inputs and outputs, like pulse width modulation for motors and serial pins.

The following is a list of microcontrollers that I own, most were purchased when a couple nearby Radio Shack stores closed down.  It is by no means a complete list - each company has different models and each model could have variations.

GM Engine Control Computer for 1991 Chevrolet S10
This is a factory engine control module from a 1991 Chevrolet S10.  Its purpose is to control the fuel injectors and read sensor data inputs.  Because of its environment, it is housed in an aluminum case.

8088 Single Board Computer
It is no longer necessary to build a Single Board Computer (SBC), like this Intel 8088 model, in order to control an autonomous vehicle.  This particular model, built for the Microcontroller classes I took, is limited by size and power requirements.  The original project was just the board, but I had to transport mine back and forth from class, so I thought a case would be better.  The power supply is from a full-sized computer.  It communicates with the "host computer" via a 9-pin serial cable.

Parallax Basic Stamp
There are a few kits and vehicles based on this chip and form factor available from retailers.

Parallax Propeller
The Propeller has 8 cores.

Texas Instrument MSP430 Launchpad Value Line Development Kit
There are different boards and chips available that have different amounts of memory and Input and Output pins.
I haven't used this board much.  So far, the problem I have with this board is that there are no holes for mounting it to something.

Arduino Uno
This board has been called the "Basic Stamp Killer".  It is widely available and easy to work with.
There are many kits and add-on boards available for this non-standard pitch form factor.
If you use the 10mm standoffs available at Radio Shack, you will have to file notches or chuck the standoff in a lathe and turn it down in order for them to fit.

Arduino AtMega2560

This board has many more Input and Output pins than the Uno.

10mm Radio Shack standoffs must be modified for this one, too.

Intel 8051
If you want to use a microcontroller dating from around 1980, that is still being used, there is the Intel 8051.  The chips above were produced by Atmel.

The boards above are typically small and have a limited number of pins available.  This can be a problem sometimes.
If you need more processing power and an RTOS, there are other boards you can use.  These include the Arduino Yun, BeagleBone Black, Raspberry Pi, and Intel Galileo, for example.

BeagleBone Black

I just got this board a few days ago, and haven't used it much yet.
One of the 10mm Radio Shack standoffs must be modified a little in order for it to fit properly for this one, too.

Raspberry Pi

I have used this board connected to a television with an RCA plug.  You can connect a mouse, keyboard, network cable, and either HDMI or RCA monitor.  It runs Linux from an SD card.


What are some other things to keep in mind?